In the contemporary online society, it is very crucial to be aware of what customers do on your website. This is exactly where Facebook Pixel comes in. It acts as a small helper that monitors the actions of people on your site thereby giving you an opportunity to know them better and consequently advertise their wishes with more precision. You can use this manual as you set up Facebook Pixel to help improve your business.
What exactly is Facebook Pixel ?
Facebook Pixel plays a major role in making sure that any business maximizes their advertising effort on Facebook. It is a piece of code presented by Facebook, which you add to your website. When this is accomplished, it enables one to monitor different actions users make on his/her site right after having interactions with the ads that appear on his/her Facebook page. This assists you in knowing the user’s behavior, optimizing your ads for better performance and also creating targeted advertising campaigns.
Table of Contents
Step-by-Step Guide to Creating a Facebook Pixel
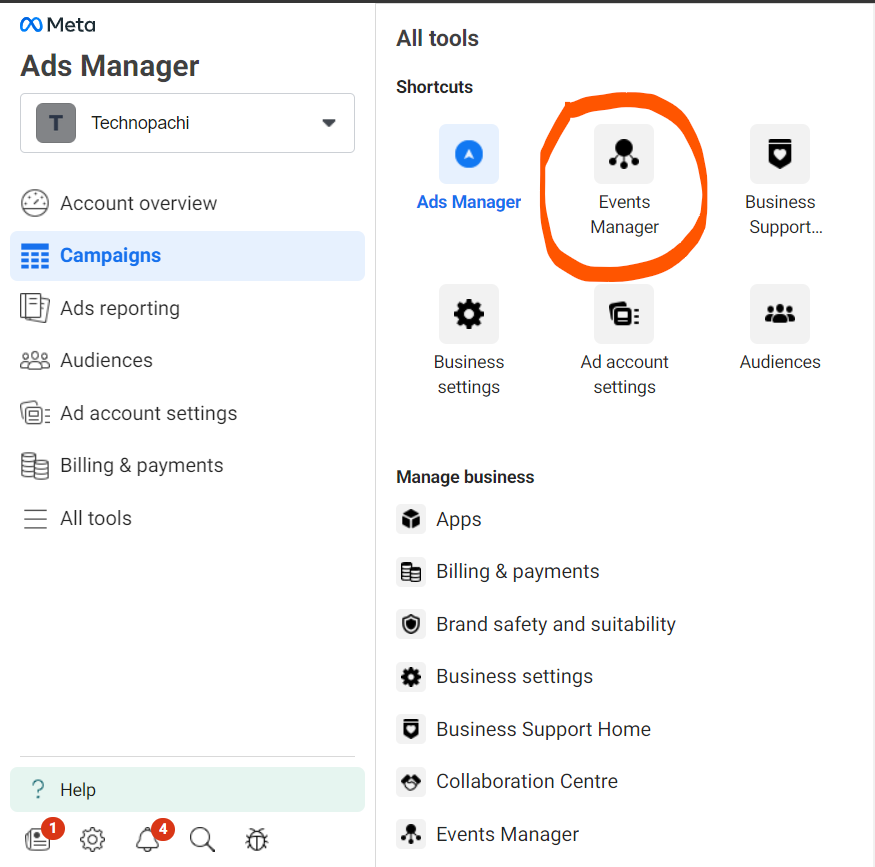
Step 1: Access Facebook Events Manager
To start, you need to access the Facebook Events Manager. Here’s how:
- Log in to Your Facebook Account: Use your credentials to log in to your Facebook account.
- Navigate to Facebook Events Manager: Go to Facebook Business and select “Events Manager” from the main menu. This is where you’ll manage your Pixel and other data sources.
Step 2: Create a Facebook Pixel
Once you’re in the Events Manager, follow these steps to create your Pixel:
- Connect Data Sources: In the Events Manager, click the Connect Data Sources button.
- Select Web: Choose “Web” as the data source you want to connect.
- Get Started: Click on the Get Started button to proceed.
- Choose Facebook Pixel: Select “Facebook Pixel” and then click Connect.
Step 3: Name Your Pixel
Next, you need to name your Pixel:
- Enter a Name for Your Pixel: Choose a name that reflects your business or website. This helps you easily identify the Pixel later on.
- Enter Your Website URL: This step is optional but can help Facebook provide easier setup options.
- Click Continue: After entering the name and URL, click Continue.
Step 4: Add the Pixel to Your Website
Now, you need to add the Pixel code to your website. There are two primary methods to do this:
- Manually Add Pixel Code to Website:
- Copy the Pixel Code: Facebook will provide a piece of code. Copy this code.
- Paste the Code into Your Website: You need to paste this code into the header section of your website. This means placing it within the
<head>tags on every page of your site. If you’re not sure how to do this, you might need help from a web developer.
- Use a Partner Integration:
- Select Your Platform: Facebook offers integrations with various platforms like WordPress, Shopify, and others.
- Follow Instructions: Choose your platform and follow the specific instructions provided by Facebook to add the Pixel to your website.
Step 5: Verify Your Pixel
After adding the Pixel to your website, it’s important to verify that it’s working correctly:
- Go Back to Facebook Events Manager: Return to the Events Manager to check your Pixel’s status.
- Check the Pixels Tab: Click on the Pixels tab to see if your Pixel is active and tracking data.
- Use Facebook Pixel Helper: Download and use the Facebook Pixel Helper Chrome extension. This tool helps you confirm that the Pixel is correctly installed and tracking data.
Step 6: Set Up Events
Setting up events allows you to track specific actions that people take on your website, such as purchases, sign-ups, or page views.
- Standard Events: Facebook provides predefined actions like PageView, AddToCart, Purchase, etc.
- In Events Manager, click Add Events.
- Select From the Pixel and choose the standard events you want to track.
- Custom Events: Define your own events for more specific tracking.
- Click Add Events and select From the Pixel.
- Choose Custom Event, name your event, and add parameters if needed.
Step 7: Test Your Pixel
Before you rely on your Pixel for data, test it to ensure everything is working correctly:
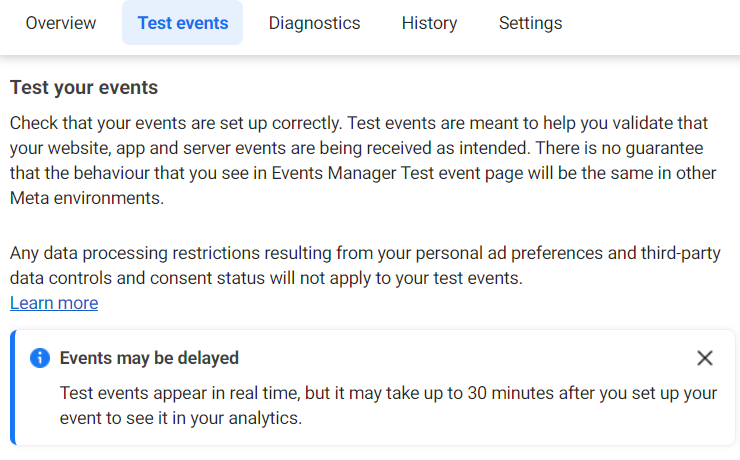
- Use the Test Events Tool: In the Events Manager, use the Test Events tool to see if your events are being tracked correctly.
- Perform Actions on Your Website: Visit your website and perform actions that should trigger the Pixel.
- Check the Events Manager: Ensure that the actions are being logged in the Events Manager.
Step 8: Use Pixel Data
Now that your Pixel is set up and verified, you can use the data to optimize your ad campaigns:
- Create Custom Audiences:
- In Events Manager, go to Audiences.
- Click Create Audience and choose Custom Audience.
- Select Website Traffic and define your audience based on the actions tracked by the Pixel.
- Optimize Ad Campaigns:
- Use the data collected by the Pixel to create lookalike audiences and retarget website visitors.
- Optimize your ad delivery for conversions and other specific actions.
Advanced Tips: How to Get More Out of Facebook Pixel
1. Pop-Up Ads That Show Your Likable Stuff to You.
Facebook pixel can assist you in displaying adverts to people according to what they engaged within your website. If for instance someone saw a pair of shoes on your site, but decided not to buy it, you can show them an advert about those shoes through Facebook. This is similar to reminding them about their interests.
2. Target or Reach the Right People With Custom Audiences
It is possible with Facebook Pixel to develop clusters of individuals who have done some actions on your site e.g. looked at a specific page then advertise only to these people. By doing so, you will reach out specifically to people who might actually be interested in whatever you are selling.
3. Find New Customers Using Lookalike Audiences
Besides that, Facebook Pixel can enable you to find more like-minded individuals as compared with your present customers by examining behaviors of your clients on the website and locating other potential customers off facebook.com that resemble them . Then you should also show ads here so that there would be more buyers.
4. Enhancing your Advertisements through Conversion Optimization
With Facebook Pixel, you can instruct it to concentrate on making people do some particular things on your website such as purchase something. This is how Facebook makes sure that it displays the adverts that reach out to the most suitable audience for them thus making them more effective and getting you more from your advertising dollar.
Keep Progressing: Analyze, Learn, and Improve
It’s important to be regularly checking at what Facebook Pixel is doing using Facebook Events Manager. Observe users’ interactions with your site and what ads are working best. Use this data to construct better ads which will make more people interested in purchasing from you.
CONCLUSION
Facebook pixel is a helpful tool for businesses to understand their clients and create better advertisements. Consequently, adhering to these easy steps and using the above advanced techniques can make Facebook pixel work for your business thereby yielding more of its potential in advertising.
Summing it up, when you’re working with Facebook Ads, think of it as having a friendly chat. Share stories, ask questions, and aim for genuine connections. Forget the complicated stuff; it’s about being relatable. In the world of Facebook Ads, it’s not just about leads; it’s about creating meaningful relationships that stand the test of digital interactions. Keep it real, and success will follow. So go ahead, set up your pixel and let it widen the scope of your business!
Frequently Asked Questions:
Let us look more into some FAQs:
1. What is Facebook Pixel?
The website has a Facebook Pixel that you place on your webpage. It’s something from Facebook which lets you know how people interact with your site such as reading certain pages or purchasing an item. The knowledge of the customer preference and their disdain through better ads.
2. How do I create a Facebook Pixel?
Creating a Facebook pixel requires accessing the Facebook ads manager tool. From there, head over to the pixels tab and click on the create pixel button. The company will take you through the process of setting up by showing you how to generate Pixel code and placing it in your website.
3. Where do I place the Facebook pixel on my website?
The most appropriate place for the Facebook pixel is at the upper part of your HTML code for your site at its header section immediately before </head>. By doing this, it ensures that even before all other elements of pages are loaded while rendering them, actions made by users can be captured effectively since users’ actions will be taken faster than that of anything else – thus resulting in an increase in traffic flow through our webpage (site).
4. Do I have to possess technical know-how in order to set up Facebook Pixel?
Although basic HTML knowledge is useful, Facebook’s instructions are easy to follow and so almost any user can use them to set up their account. If you face difficulties, Facebook’s support resources and community forums may be of help.
5. What events can be traced using Pixel?
The range of events that this tool can trace includes page views, sales, add to cart clicks, registrations among other custom events you may want to designate for your online goals.
6: Is it possible to Track Conversions From Facebook Ads With Pixel?
Yes, the Facebook Pixel is capable of tracking conversions from your Facebook ads. When you set up conversion tracking, you will be able to check ad performance and make them better.
7: How do I confirm if my Facebook pixel is working correctly?
Facebook offers a useful plugin called Pixel Helper which is a Chrome extension that checks the installation and workability of your Pixel. It immediately discovers any problems with how your Pixel has been used or not used and offers suggestions on how to correct them.
8: Can I use Facebook Pixel with other advertising platforms?
Even though Facebook Pixel is mainly intended for Facebook commercials, its capabilities may be utilized in conjunction with different commercial platforms such as exporting data or using third-party tools for multi-platform tracking and optimization.
9. Do data privacy regulations approve Facebook Pixel?
Facebook Pixel should be used with caution as it gathers user information to comply with data privacy legislations like GDPR (General Data Protection Regulation). Such steps include making explicit disclosures of data collection practices, obtaining permission when necessary from users and putting in place proper measures to ensure that users’ information is protected.
10. Is it possible for me to utilize Facebook Pixel for retargeting?
Definitely yes! By using Facebook Pixel, one can create custom audiences based on how the audience has interacted with your site. This will enable you to follow up on them with well-prepared messages so that you can have an opportunity to turn them into sales.
–